什么是装饰器模式?
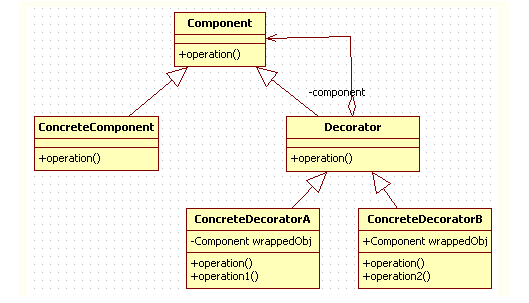
顾名思义,装饰模式就是给一个对象增加一些新的功能,而且是动态的,要求装饰对象和被装饰对象实现同一个接口,装饰对象持有被装饰对象的实例,关系图如下:
- Component为统一接口,也是装饰类和被装饰类的基本类型。
- ConcreteComponent为具体实现类,也是被装饰类,他本身是个具有一些功能的完整的类。
- Decorator是装饰类,实现了Component接口的同时还在内部维护了一个ConcreteComponent的实例,并可以通过构造函数初始化。而Decorator本身,通常采用默认实现,他的存在仅仅是一个声明:我要生产出一些用于装饰的子类了。而其子类才是赋有具体装饰效果的装饰产品类。
- ConcreteDecorator是具体的装饰产品类,每一种装饰产品都具有特定的装饰效果。可以通过构造器声明装饰哪种类型的ConcreteComponent,从而对其进行装饰。
简单实现装饰器模式
1 | //基础接口 |
这样一个基本的装饰器体系就出来了,当我们想让Component在打印之前都有一个ready?go!的提示时,就可以使用ConcreteDecorator类了。具体方式如下:1
2
3
4
5
6
7//使用装饰器
Component component = new ConcreteDecorator(new ConcretComponent());
component.biu();
//console:
ready?go!
biubiubiu
为何使用装饰器模式
一个设计模式的出现一定有他特殊的价值。仅仅看见上面的结构图你可能会想,为何要兜这么一圈来实现?仅仅是想要多一行输出,我直接继承ConcretComponent,或者直接在另一个Component的实现类中实现不是一样吗?
首先,装饰器的价值在于装饰,他并不影响被装饰类本身的核心功能。在一个继承的体系中,子类通常是互斥的。比如一辆车,品牌只能要么是奥迪、要么是宝马,不可能同时属于奥迪和宝马,而品牌也是一辆车本身的重要属性特征。但当你想要给汽车喷漆,换坐垫,或者更换音响时,这些功能是互相可能兼容的,并且他们的存在不会影响车的核心属性:那就是他是一辆什么车。这时你就可以定义一个装饰器:喷了漆的车。不管他装饰的车是宝马还是奥迪,他的喷漆效果都可以实现。
再回到这个例子中,我们看到的仅仅是一个ConcreteComponent类。在复杂的大型项目中,同一级下的兄弟类通常有很多。当你有五个甚至十个ConcreteComponent时,再想要为每个类都加上“ready?go!”的效果,就要写出五个子类了。毫无疑问这是不合理的。装饰器模式在不影响各个ConcreteComponent核心价值的同时,添加了他特有的装饰效果,具备非常好的通用性,这也是他存在的最大价值。
实战中使用装饰器模式
写这篇博客的初衷也是恰好在工作中使用到了这个模式,觉得非常好用。需求大致是这样:采用sls服务监控项目日志,以Json的格式解析,所以需要将项目中的日志封装成json格式再打印。现有的日志体系采用了log4j + slf4j框架搭建而成。调用起来是这样的:1
2private static final Logger logger = LoggerFactory.getLogger(Component.class);
logger.error(string);
这样打印出来的是毫无规范的一行行字符串。在考虑将其转换成json格式时,我采用了装饰器模式。目前有的是统一接口Logger和其具体实现类,我要加的就是一个装饰类和真正封装成Json格式的装饰产品类。具体实现代码如下:1
2
3
4
5
6
7
8
9
10
11
12
13
14
15
16
17
18
19
20
21
22
23
24/**
* logger decorator for other extension
* this class have no specific implementation
* just for a decorator definition
* @author jzb
*
*/
public class DecoratorLogger implements Logger {
public Logger logger;
public DecoratorLogger(Logger logger) {
this.logger = logger;
}
@Override
public void error(String str) {}
@Override
public void info(String str) {}
//省略其他默认实现
}
1 | /** |
可以看到,在JsonLogger中,对于Logger的各种接口,我都用JsonObject对象进行一层封装。在打印的时候,最终还是调用原生接口logger.error(string),只是这个string参数已经被我们装饰过了。如果有额外的需求,我们也可以再写一个函数去实现。比如error(Exception e),只传入一个异常对象,这样在调用时就非常方便了。
另外,为了在新老交替的过程中尽量不改变太多的代码和使用方式。我又在JsonLogger中加入了一个内部的工厂类JsonLoggerFactory(这个类转移到DecoratorLogger中可能更好一些),他包含一个静态方法,用于提供对应的JsonLogger实例。最终在新的日志体系中,使用方式如下:1
2private static final Logger logger = JsonLoggerFactory.getLogger(Component.class);
logger.error(string);
他唯一与原先不同的地方,就是LoggerFactory -> JsonLoggerFactory,这样的实现,也会被更快更方便的被其他开发者接受和习惯。
参考:1
2https://www.cnblogs.com/jzb-blog/p/6717349.html
http://www.runoob.com/design-pattern/decorator-pattern.html