什么是IOC
IOC(Inversion Of Control)的意思是控制反转,它的思想是从容器的角度出发,容器控制应用程序,由容器反向的向应用程序注入应用程序所需的外部资源,说白了就是把对象的控制权交给容器来管理。实现方式就是将new对象这个步骤交给容器来做,对象里面的属性的赋值也是交给容器来注入。这里大家肯定都想到了,IOC就是通过反射来实现的。
这里我想强调一下,IOC和DI(Dependence Injection)是什么关系。本质上说他们描述的是一个事情,只是IOC是从程序的角度出发,将new对象这个事交给了容器,所以叫依赖注入。而DI则是从容器出发,将各种依赖通过容器注入,以达到解耦和的目的。
IOC的优缺点
优点:
1、把对象的创建和依赖关系定义在了XML文件中,我们改变子类的实现变得异常简单。
2、控制反转减轻了对象之间的耦合度,减轻了对象之间的依赖关系,增加了系统的灵活性,可维护性,以及可移植性等等。
缺点:
1、生成对象的方式变复杂了(事实上操作还是挺简单的),对于不习惯这种方式的人,会觉得有些别扭和不直观。
2、创建对象因为使用了反射技术,在效率上有些损耗。但相对于IOC提高的维护性和灵活性来说,这点损耗是微不足道的,除非某对象的生成对效率要求特别高。
Spring中IOC的实现
Spring中实现IOC有五种注入方式
Setter注入
这种方式需要被注入的JavaBean的属性需要有set方法。
1、被注入类:1
2
3
4
5
6
7
8
9
10
11
12
13
14
15
16
17
18
19
20
21
22
23
24
25
26
27
28
29
30
31
32
33
34
35
36
37
38
39
40
41
42
43
44
45
46
47
48
49
50
51
52
53
54
55
56
57
58
59
60
61
62
63
64
65
66
67
68package com.aowin.testspring.di;
import java.util.Date;
import com.aowin.testspring.ioc.InterfaceA;
public class ClassB {
private Integer userid;
private String username;
private Date birthday;
private InterfaceA ia;
public ClassB() {
// TODO Auto-generated constructor stub
}
public ClassB(Integer userid, String username, Date birthday, InterfaceA ia) {
super();
this.userid = userid;
this.username = username;
this.birthday = birthday;
this.ia = ia;
}
public void methodB() {
System.out.println(ia.getInfo());
}
public InterfaceA getIa() {
return ia;
}
public void setIa(InterfaceA ia) {
this.ia = ia;
}
public Integer getUserid() {
return userid;
}
public void setUserid(Integer userid) {
this.userid = userid;
}
public String getUsername() {
return username;
}
public void setUsername(String username) {
this.username = username;
}
public Date getBirthday() {
return birthday;
}
public void setBirthday(Date birthday) {
this.birthday = birthday;
}
@Override
public String toString() {
return "ClassB [userid=" + userid + ", username=" + username + ", birthday=" + birthday + ", ia=" + ia + "]";
}
}
这个JavaBean中有四个属性,数据类型分别是Integer、String、Date(ps:为什么用Integer不直接用int呢?因为如果用int的话,jvm迟早会将int自动装箱,那我们为什么不一开始就用Integer来提高程序执行的效率呢。)和接口interfaceA
2、在配置文件中:1
2
3
4
5
6
7
8<!-- Setter注入 -->
<bean id="classb" class="com.aowin.testspring.di.ClassB">
<property name="userid" value="1810"></property>
<property name="username" value="张三"></property>
<property name="birthday">
<bean class="java.util.Date"></bean>
</property>
</bean>
在配置文件中,我们一一将ClassB对象所需的资源通过property标签注入进去。
3、测试方法:1
2
3
4
5
6
7
8
9
10@Test
public void test() {
//如果放在了resource的根目录下
ClassPathXmlApplicationContext context =
new ClassPathXmlApplicationContext("springDI.xml");
ClassB classb = context.getBean("classb",ClassB.class);
System.out.println(classb.toString());
classb.methodB();
context.close();
}
ClassPathXmlApplicationContextl类是Spring提供的类,它有一个getBean()方法,我们只需要传入前面配置的id值,就可以得到对象。我们是将配置文件放在了src/main/resources下,所以直接用ClassPathXmlApplicationContextl来读取配置文件,如果你的配置文件放在别的路径下,可以使用FileSystemXmlApplicationContext类,然后通过绝对路径来读取配置文件。
4、执行结果:
可以看到程序并没有报空指针异常,并且对象的属性值也成功的被注入。
interface注入
1、我们先写一个interfaceA接口的实现类ClassA:1
2
3
4
5
6
7
8
9
10
11
12
13
14package com.aowin.testspring.ioc;
public class ClassA implements InterfaceA {
public ClassA() {
// TODO Auto-generated constructor stub
}
@Override
public String getInfo() {
return "企业管理系统的公告模块:实现公告发布、修改、删除、查询等操作";
}
}
ClassB类不做改动。
2、在配置文件中:1
2
3
4
5<!-- interface注入 -->
<bean id="classa" class="com.aowin.testspring.ioc.ClassA"></bean>
<bean id="classb2" class="com.aowin.testspring.di.ClassB">
<property name="ia" ref="classa"></property>
</bean>
先配置一个interfaceA实现类,在配置ClassB的时候,将配置的ClassA通过ref属性注入进去。
3、测试方法:1
2
3
4
5
6
7
8
9
10@Test
public void test3() {
//如果放在了resource的根目录下
ClassPathXmlApplicationContext context =
new ClassPathXmlApplicationContext("springDI.xml");
ClassB classb = context.getBean("classb3",ClassB.class);
System.out.println(classb.toString());
classb.methodB();
context.close();
}
4、运行结果:
可以看到我们成功的将ClassA注入到了ClassB中。但是遗憾的是,接口注入和属性注入的功能差不多,但接口使得项目的类数量变多,现如今不推崇使用接口注入。
constructor注入
构造器注入。构造器注入需要JavaBean有对应的构造方法才能使用这种方式。
ClassB有一个带全部参数的构造方法,在这里我们不做改动。
1、在配置文件中:1
2
3
4
5
6
7
8
9<!-- constructor注入 -->
<bean id="classb3" class="com.aowin.testspring.di.ClassB">
<constructor-arg index="0" value="1812"></constructor-arg>
<constructor-arg index="1" value="张三"></constructor-arg>
<constructor-arg index="2">
<bean class="java.util.Date"></bean>
</constructor-arg>
<constructor-arg index="3" ref="classa"></constructor-arg>
</bean>
可以看到,在配置文件中,我们不再是像Setter注入一样,用property标签,而是使用constructor-arg标签来配置。在constructor-arg标签中,index表示的是构造方法参数的索引下标(从0开始)。
2、测试方法:1
2
3
4
5
6
7
8
9
10@Test
public void test3() {
//如果放在了resource的根目录下
ClassPathXmlApplicationContext context =
new ClassPathXmlApplicationContext("springDI.xml");
ClassB classb = context.getBean("classb3",ClassB.class);
System.out.println(classb.toString());
classb.methodB();
context.close();
}
3、执行结果:
可以看到,我们通过构造方法配置方式将所有的属性值都成功注入。
AutoWire注解
AutoWired注入方式可以不用写set方法。我们写三个类来模拟Autowired注入。
ClassE:1
2
3
4
5
6
7
8
9
10
11
12package com.aowin.testspring.di;
public class ClassC {
public ClassC() {
// TODO Auto-generated constructor stub
}
public void methodC() {
System.out.println("ClassC Method");
}
}
ClassD:1
2
3
4
5
6
7
8
9
10
11
12package com.aowin.testspring.di;
public class ClassD {
public ClassD() {
// TODO Auto-generated constructor stub
}
public void methodD() {
System.out.println("ClassD Method");
}
}
ClassE:1
2
3
4
5
6
7
8
9
10
11
12
13
14
15
16
17
18
19
20
21
22
23
24
25
26
27package com.aowin.testspring.di;
import org.springframework.beans.factory.annotation.Autowired;
public class ClassE {
@Autowired
private ClassC cc;
@Autowired
private ClassD cd;
public ClassE() {
// TODO Auto-generated constructor stub
}
public void methodE() {
cc.methodC();
cd.methodD();
}
@Override
public String toString() {
return "ClassE [cc=" + cc + ", cd=" + cd + "]";
}
}
ClassE中有两个属性分别是ClassC和ClassD。属性上都加了注解@Autowired这个注解是Spring提供的。
1、在配置文件中:1
2
3
4
5<context:annotation-config />
<!-- AutoWire注入 -->
<bean id="cc" class="com.aowin.testspring.di.ClassC"></bean>
<bean id="cd" class="com.aowin.testspring.di.ClassD"></bean>
<bean id="classe" class="com.aowin.testspring.di.ClassE" autowire="byName"></bean>
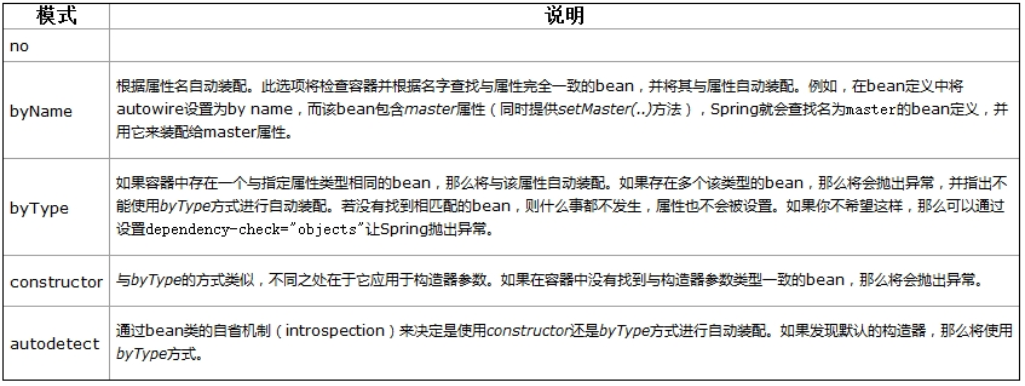
首先我们需要先开启Autowired模式,用context:annotation-config标签。然后直接配置bean,但是id值需要和属性名相同。autowire默认是安卓byType方式匹配。autowire的值可以是byName、byType、constructor、autodetect、no他们的功能如下:
2、测试方法:1
2
3
4
5
6
7
8
9
10@Test
public void test4() {
//如果放在了resource的根目录下
ClassPathXmlApplicationContext context =
new ClassPathXmlApplicationContext("springDI.xml");
ClassE classb = context.getBean("classe",ClassE.class);
System.out.println(classb.toString());
classb.methodE();
context.close();
}
3、运行结果:
可以看到程序并未报空指针异常。这种配置方式使我们不需要再写set方法了,节省了我们的时间。
Resource注解
@Resource并不是spring提供的,由J2EE提供,@Resource默认按照ByName自动注入,需要导入包javax.annotation.Resource。
@Resource有两个重要的属性:name和type,而Spring将@Resource注解的name属性解析为bean的名字,而type属性则解析为bean的类型。所以,如果使用name属性,则使用byName的自动注入策略,而使用type属性时则使用byType自动注入策略。如果既不制定name也不制定type属性,这时将通过反射机制使用byName自动注入策略。
1、我们写一个新类ClassF:1
2
3
4
5
6
7
8
9
10
11
12
13
14
15
16
17
18
19
20
21
22
23
24
25
26
27
28
29
30
31
32package com.aowin.testspring.di;
import javax.annotation.Resource;
import org.springframework.beans.factory.annotation.Autowired;
import org.springframework.beans.factory.annotation.Qualifier;
import com.aowin.testspring.ioc.InterfaceA;
public class ClassF {
@Resource(name = "classA")
private InterfaceA ia1;
@Resource(name = "classa")
private InterfaceA ia2;
public ClassF() {
// TODO Auto-generated constructor stub
}
public void methodE() {
System.out.println(ia1.getInfo());
System.out.println(ia2.getInfo());
}
@Override
public String toString() {
return "ClassF [ia1=" + ia1 + ", ia2=" + ia2 + "]";
}
}
@Resource注解设置了name属性,是为了后面匹配用。这里的InterfaceA类型是延用的前面的interfaceA接口。之前我们还写了它的实现类ClasssA。
2、配置文件中:1
2
3
4
5<bean id="classa" class="com.aowin.testspring.ioc.ClassA"></bean>
<bean id="classA" class="com.aowin.testspring.ioc.ClassA"></bean>
<bean id="classf" class="com.aowin.testspring.di.ClassF"></bean>
<!-- Annotation注入 -->
<context:annotation-config />
首先我们要开启注解,同样通过context:annotation-config标签来开启。id的值classa和classA需要和类中的name属性值对应。
3、测试方法:1
2
3
4
5
6
7
8
9
10@Test
public void test5() {
//如果放在了resource的根目录下
ClassPathXmlApplicationContext context =
new ClassPathXmlApplicationContext("springDIAnnotation.xml");
ClassF classb = context.getBean("classf",ClassF.class);
System.out.println(classb.toString());
classb.methodE();
context.close();
}
4、运行结果: