什么是AOP
AOP是面向切面编程,听起来很高大上其实很大程度上可以说就是通过代理模式来增强我们的方法,从而满足我们的目的。说白了就是在我们原有的方法执行之前、执行之后、抛出异常后或返回数据之后添加一些东西,组成一个新的代理方法,代理方法中包含了原来的业务逻辑,并且增强了原来的业务方法。
为什么用AOP
- 可以减少代码的编写。(Write less,Do more)
- 写代码的时候可以只关注自己本身的业务,不用去考虑别的事情,比如:安全,事务,日志等。
AOP中的术语
AOP(Aspect-Oriented Programming)叫做面向切面编程。很多的资料中在说明什么是AOP的时候用到了AOP中的一些术语,如果要学会AOP就必须要学会AOP中的术语。在这里对AOP中的术语只做一个简单的介绍
通知(advice)
通知是你要增强的内容。也就是前面说的安全,事务,日志等。我们先把通知定义好方便后面的使用
连接点(JoinPoint)
就是你可以增强的地方,比如方法执行前、执行后、抛出异常后等都是连接点。
切入点(PointCut)
你所允许的可以被织入的连接点就是切入点,切入点一定是连接点,连接点不一定是切入点。
切面(Aspect)
切面就是切入点和通知的结合。通知说明了干什么,切入点说明了在哪里干。切面就是在哪里干了什么。
目标(target)
前面说的连接点和切入点都是建立在方法上的,而方法是对象的。这里说的目标就是切入点的所属对象。这就是要被通知的对象!它在它不知情的情况下,被我们织入了切面
代理(proxy)
代理可以理解成我们增了原来的类之后得到的新的类,这个类就是代理类。这样代理就好容易理解了。
织入(weaving)
把切面应用到目标对象来创建新的代理对象的过程
Spring中实现AOP
Spring中的一大特点就是AOP。并且Spring对AOP有多种实现方式。
前提
用JDK实现动态代理,被代理对象必须要实现一个接口。在这里我们先建立所需的接口和实现类。
接口:1
2
3
4
5
6
7
8
9
10
11
12
13
14
15
16
17
18
19
20
21
22
23package com.aowin.testspring.aop.service;
/**
* @author haozai
* @date 2018年12月12日 上午11:50:56
*/
public interface InfoService {
/**
* 模拟获取学生信息方法
*/
public String getInfo(String name,int age);
/**
* 模拟添加学生信息方法
*/
public String insertInfo(String name,int age);
/**
* 模拟修改学生信息方法
*/
public String updateInfo(String name,int age);
}
实现类(被代理的类):1
2
3
4
5
6
7
8
9
10
11
12
13
14
15
16
17
18
19
20
21
22
23
24package com.aowin.testspring.aop.service;
public class InfoServiceImpl {
public InfoServiceImpl() {
// TODO Auto-generated constructor stub
}
public String getInfo(String name, int age) {
System.out.println("getInfo工作中");
return "getInfo 姓名:"+name+" 年龄:"+String.valueOf(age);
}
public String insertInfo(String name, int age) {
System.out.println("insertInfo工作中");
return "insertInfo 姓名:"+name+" 年龄:"+String.valueOf(age);
}
public String updateInfo(String name, int age) {
System.out.println("updateInfo工作中");
return "updateInfo 姓名:"+name+" 年龄:"+String.valueOf(age);
}
}
最后我们要写好通知,就是加强的内容:1
2
3
4
5
6
7
8
9
10
11
12
13
14
15
16
17
18
19
20
21
22
23
24
25
26
27package com.aowin.testspring.aop.advice;
import java.lang.reflect.Method;
import org.apache.commons.logging.Log;
import org.apache.commons.logging.LogFactory;
import org.springframework.aop.MethodBeforeAdvice;
/**
* 前置通知类
* @author haozai
* @date 2018年12月12日 下午12:00:36
*/
public class InfoBeforeAdvice implements MethodBeforeAdvice{
private Log log = LogFactory.getLog(InfoBeforeAdvice.class);
public InfoBeforeAdvice() {
// TODO Auto-generated constructor stub
}
public void before(Method method, Object[] args, Object target) throws Throwable {
log.info("目标对象:"+target);
log.info("访问的方法:"+method.getName());
}
}
这个类需要实现 org.springframework.aop.MethodBeforeAdvice接口,并重写before方法。该方法中的参数:
- Method:被代理方法
- Object[]:被代理方法的参数
- target:被代理对象
基础声明式
这种实现方式是最基本的实现方式。 下面是过程。
基础声明式配置:
1.声明目标类1
2<!-- 声明目标类-->
<bean id="infoServiceImpl" class="com.aowin.testspring.aop.service.InfoServiceImpl"></bean>
2.声明通知类1
2<!-- 声明通知类 -->
<bean id="infoBeforeAdvice" class="com.aowin.testspring.aop.advice.InfoBeforeAdvice"></bean>
如果我们想自己筛选切入点的话我们还可以配置:1
2
3
4
5
6
7
8
9
10<bean id="infoBeforeAdviceAdvisor"
class="org.springframework.aop.support.RegexpMethodPointcutAdvisor">
<property name="advice" ref="infoBeforeAdvice"></property>
<!--指定要代理的方法 -->
<property name="patterns">
<list>
<value>.*getInfo.*</value>
</list>
</property>
</bean>
org.springframework.aop.support.RegexpMethodPointcutAdvisor这个类可以通过正则表达式来筛选我们的切入点。它是通过筛选方法名来获取切入点的,在这里我们配置的是方法名包含getInfo字符串的所有方法。
3.配置代理工厂1
2
3
4
5
6
7
8
9
10
11
12
13
14
15
16
17
18
19
20<!-- 配置代理工厂 -->
<bean id="proxy" class="org.springframework.aop.framework.ProxyFactoryBean">
<!-- 设置通知类 -->
<property name="interceptorNames">
<list>
<value>infoBeforeAdviceAdvisor</value>
</list>
</property>
<!-- 设置目标对象 -->
<property name="target" ref="infoServiceImpl">
</property>
<!-- 设置目标对应的接口 -->
<property name="proxyInterfaces">
<list>
<value>com.aowin.testspring.aop.service.InfoService</value>
</list>
</property>
</bean>
在我们自己设置的代理工厂中。我们必须要设置目标对象,和通知类。也就是给org.springframework.aop.framework.ProxyFactoryBean类中的interceptorNames和target属性赋上合适的值。在这里我们写上前面配置的目标类和通知。在配置文件中我们还配置了proxyInterfaces属性,是配置了目标类实现的接口,从而提高Spring的效率,不需要Spring去寻找。
4.在测试方法中:1
2
3
4
5
6
7
8
9@Test
public void testBaseProxy() {
ClassPathXmlApplicationContext context =
new ClassPathXmlApplicationContext("springAOP.xml");
InfoService is = context.getBean("proxy",InfoService.class);
is.getInfo("张三", 10);
is.insertInfo("王五", 18);
context.close();
}
5.最后的执行结果:
可以看到只有getInfo()方法被织入了切面了。在该方法执行前执行了通知方法。而insertInfo()方法并未被代理。
aop:config方式
前提:如果我们用的是aop:config方式,那么我们的通知类需要修改。这里的前置通知类并不要实继承org.springframework.aop.MethodBeforeAdvice类,只需要在通知方法中引入一个JoinPoint类型的参数,这个参数中可以得到被代理对象,被代理方法名,被代理方法参数等信息!:1
2
3
4
5
6
7
8
9
10
11
12
13
14
15
16
17
18
19
20
21
22
23
24
25
26
27
28
29package com.aowin.testspring.aop.advice;
import java.lang.reflect.Method;
import org.apache.commons.logging.Log;
import org.apache.commons.logging.LogFactory;
import org.aspectj.lang.JoinPoint;
import org.springframework.aop.MethodBeforeAdvice;
/**
* 前置通知类
* @author haozai
* @date 2018年12月12日 下午12:00:36
*/
public class InfoBeforeAdvice2 {
private Log log = LogFactory.getLog(InfoBeforeAdvice2.class);
public InfoBeforeAdvice2() {
// TODO Auto-generated constructor stub
}
public void before(JoinPoint jp) throws Throwable {
log.info("目标对象:"+jp.getTarget());
log.info("访问的方法:"+jp.getSignature().getName());
}
}
1.声明目标类1
2<!-- 声明目标类 -->
<bean id="infoServiceImpl" class="com.aowin.testspring.aop.service.InfoServiceImpl"></bean>
2.声明通知类1
2<!-- 声明通知类 -->
<bean id="infoBeforeAdvice" class="com.aowin.testspring.aop.advice.InfoBeforeAdvice2"></bean>
3.配置自动代理机制1
2
3
4
5
6
7
8
9
10<!-- 自动代理机制 -->
<aop:config proxy-target-class="true">
<!-- 声明切入点 -->
<aop:pointcut expression="execution(* com.aowin.testspring.aop.service.InfoServiceImpl.insert*(..))" id="beforepointcut"/>
<!-- 配置切面 -->
<aop:aspect ref="infoBeforeAdvice">
<!-- 配置通知和切入点 -->
<aop:before method="before" pointcut-ref="beforepointcut"/>
</aop:aspect>
</aop:config>
aop:config标签中可以设置proxy-target-class,默认是等于false。false表示用JDK的动态代理机制,true表示用cglib的动态代理机制。
在标签中要声明好你要使用的切入点。在配置切面中,需要用ref属性指向前面声明的通知类,并且需要配置切面子标签,可以是前置通知(aop:before)、后置通知(aop:after)、环绕通知(aop:around)等。剩下的切面子标签中自然少不了配置通知(method)和切入点(pointcut)了。
配置自动代理机制有一个知识点是:execution表达式。这里不做过多描述。只解释一下我配置的什么意思。
execution(* com.aowin.testspring.aop.service.InfoServiceImpl.insert*(..)):第一个*代表任意权限的方法,第二个*代表方法名是以insert开头的所有方法 ,(..)匹配的是所有参数类型的方法。
4.在测试方法中:1
2
3
4
5
6
7
8
9@Test
public void testAopConfig() {
ClassPathXmlApplicationContext context =
new ClassPathXmlApplicationContext("springAOP2.xml");
InfoService is = context.getBean("infoServiceImpl",InfoService.class);
is.getInfo("张三", 10);
is.insertInfo("王五", 18);
context.close();
}
5.执行结果:
可以看到getInfo()方法没有被代理,而insertInfo()方法被织入了一个切面。
注解方式
注解方式是最简便的一种方式,要使用注解方法就要对execution表达式比较熟悉。
修改通知类:1
2
3
4
5
6
7
8
9
10
11
12
13
14
15
16
17
18
19
20
21
22
23
24package com.aowin.testspring.aop.advice.annotation;
import org.apache.commons.logging.Log;
import org.apache.commons.logging.LogFactory;
import org.aspectj.lang.JoinPoint;
import org.aspectj.lang.annotation.Aspect;
import org.aspectj.lang.annotation.Before;
@Aspect
public class InfoBeforeAdvice {
private Log log = LogFactory.getLog(InfoBeforeAdvice.class);
public InfoBeforeAdvice() {
// TODO Auto-generated constructor stub
}
//配置通知 配置切入点
@Before(value = "execution(* com.aowin.testspring.aop.service.*.*(..))")
public void before(JoinPoint jp) {
log.info("目标对象:"+jp.getTarget());
log.info("访问方法:"+jp.getSignature().getName());
}
}
@Aspect注解:声明一个类为通知类
@Before:声明这个方法为前置通知方法。它的value值就是匹配切入点,是execution表达式。我这里匹配的是 任何权限的,com.aowin.testspring.aop.service包下的所有的类下的所有方法。
另外还有@After、@AfterReturning、@AfterThrowing等注解,用法和Before相似。
剩下的步骤就简单很多了:
1.声明通知类:1
2<!-- 声明通知类 -->
<bean class="com.aowin.testspring.aop.advice.annotation.InfoBeforeAdvice"></bean>
2.声明目标类1
2<!-- 声明目标类 -->
<bean id="infoServiceImpl" class="com.aowin.testspring.aop.service.InfoServiceImpl"></bean>
3.开启aop自动代理(是否使用cglib由你自己设定)1
2<!-- aop自动代理 -->
<aop:aspectj-autoproxy proxy-target-class="true"/><!-- 启用了cglib动态代理 -->
这样子我们就配置好了注解方式的aop实现。
4.测试代码:1
2
3
4
5
6
7
8
9@Test
public void testAopAnnotation() {
ClassPathXmlApplicationContext context =
new ClassPathXmlApplicationContext("springAOPAnno.xml");
InfoService is = context.getBean("infoServiceImpl",InfoService.class);
is.getInfo("张三", 10);
is.insertInfo("王五", 18);
context.close();
}
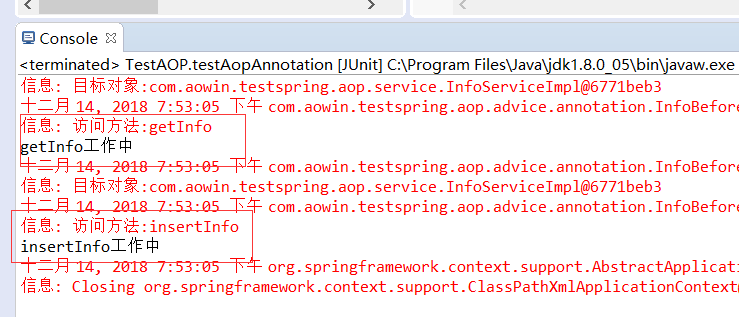
5.运行结果:
可以看到,getinfo()方法和insertInfo()都被织入了一个切面。